CodeV

7.9-应用Core Image转换

Core Image转换是另一个有价值的timer-meets-drawing解决方案。它们使您能够在源图像和目标图像之间创建序列,以便构建从一个到另一个过渡的栩栩如生的视觉效果。

您首先创建一个新的过渡过滤器,例如复制machine–style转换:

transition = [CIFilter filterWithName:@”CICopyMachineTransition”];

您提供输入图像和目标图像,并指定沿着转换进展的进度,从0.0到1.0。 清单7-6定义了一种演示此过程的方法,生成沿该时间轴插值的CIImage

清单7-6应用Core Image复印机转换效果

1
2
3
4
5
6
7
8
9
10
11
12
13
14
15
16
17
18
19
20
21
22
23
24
25
26
27
- (CIImage *)imageForTransitionCopyMachine: (float) t
{
CIFilter *crop;
if (!transition)
{
transition = [CIFilter filterWithName:
@"CICopyMachineTransition"];
[transition setDefaults];
}

[transition setValue: self.inputImage
forKey: @"inputImage"];
[transition setValue: self.targetImage
forKey: @"inputTargetImage"];
[transition setValue: @(fmodf(t, 1.0f))
forKey: @"inputTime"];

// This next bit crops the image to the desired size
CIFilter *crop = [CIFilter filterWithName: @"CICrop"];
[crop setDefaults];
[crop setValue:transition.outputImage
forKey:@"inputImage"];
CIVector *v = [CIVector vectorWithX:0 Y:0
Z:_i1.size.width W:_i1.size.width];
[crop setValue:v forKey:@"inputRectangle"];
return [crop valueForKey: @"outputImage"];
}

每个Core Image过滤器都使用一组自定义参数,这些参数记录在Apple的Core Image Filter参考文献中。 复印机序列是最简单的转换选项之一。 如清单7-6所示,它可以很好地与两个图像和一个inputTime一起使用。 您将在图7-10中看到转换。
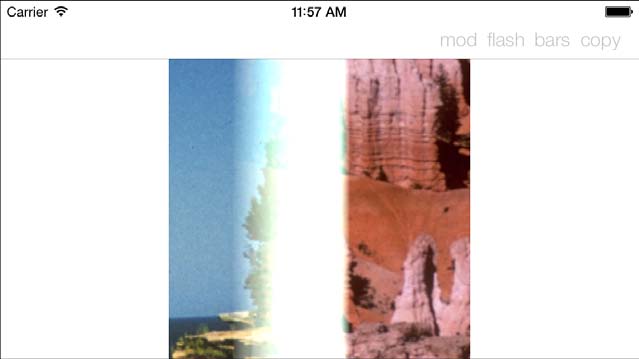
图7-10

图7-10复印机转换通过模拟复印机与其明亮的扫描条从一个图像移动到另一个图像。Public domain images courtesy of the National Park Service.

display link使您能够为转换过程提供动力。 与示例7-4不同,清单7-7不使用真实的时序 - 尽管您可以轻松地修改这些方法,使其成为可能。 相反,它跟踪进度变量,每次display link触发时递增,每次移动5%的进度(progress + = 1.0f / 20.0f)。

随着link的触发,转换方法更新进度并请求重绘。 清单7-7中的drawRect:方法从过滤器中提取当前的“between”图像,并将其绘制到上下文中。 当进度达到100%时,display link自身失效。

清单7-7使用Core Image和Display Links进行转换

1
2
3
4
5
6
7
8
9
10
11
12
13
14
15
16
17
18
19
20
21
22
23
24
25
26
27
28
29
30
31
32
33
34
35
36
37
38
39
40
41
42
43
44
45
46
47
48
49
50
51
52
53
54
55
56
57
58
59
// Begin a new transition
- (void) transition: (int) theType bbis: (NSArray *) items
{
// Disable the GUI
for (UIBarButtonItem *item in (bbitems = items))
item.enabled = NO;

// Reset the current CATransition
transition = nil;
transitionType = theType;

// Start the transition from zero
progress = 0.0;
link = [CADisplayLink displayLinkWithTarget:self
selector:@selector(applyTransition)];
[link addToRunLoop:[NSRunLoop mainRunLoop]
forMode:NSRunLoopCommonModes];
}

// This method runs each time the display link fires
- (void) applyTransition
{
progress += 1.0f / 20.0f;
[self setNeedsDisplay];

if (progress > 1.0f)
{
// Our work here is done
[link invalidate];

// Toggle the two images
useSecond = ! useSecond;

// Re-enable the GUI
for (UIBarButtonItem *item in bbitems)
item.enabled = YES;
}
}

// Update the presentation
- (void) drawRect: (CGRect) rect
{
// Fit the results
CGRect r = SizeMakeRect(_i1.size);
CGRect fitRect = RectByFittingRect(r, self.bounds);

// Retrieve the current progress
CIImage *image = [self imageForTransition:progress];

// Draw it (it’s a CIImage, not a CGImage)
if (!cicontext) cicontext =
[CIContext contextWithOptions:nil];
CGImageRef imageRef = [cicontext
createCGImage:image fromRect:image.extent];

FlipContextVertically(self.bounds.size);
CGContextDrawImage(UIGraphicsGetCurrentContext(),
fitRect, imageRef);
}

本文翻译自《iOS Drawing Practical UIKit Solutions》作者:Erica Sadun,翻译:Cheng Dong。如果觉得本书不错请购买支持正版:亚马逊购买传送门,本书所有源代码可在GitHub上下载。译者虽然力求做到信,达,雅,但是由于时间仓促加之译者水平十分有限,文中难免会出现不正确,不准确,词不达意,难于理解的地方,还望各位批评指正,共同进步,谢谢。转载请注明出处。