CodeV

7.4-模糊

尽管在计算上需要花费昂贵的代价,但是模糊是必不可少的绘图工具。 它使您能够在应用蒙版时软化边界的过渡效果和在建立令人眼花缭乱的视觉效果时形成伪深度感。 您将在图7-3中看到一个例子。 被称为“散景”,这种效果是指图像中的焦点外元素的美学效果。 模糊模拟照相镜头捕捉景深的方式来创建多维表现。
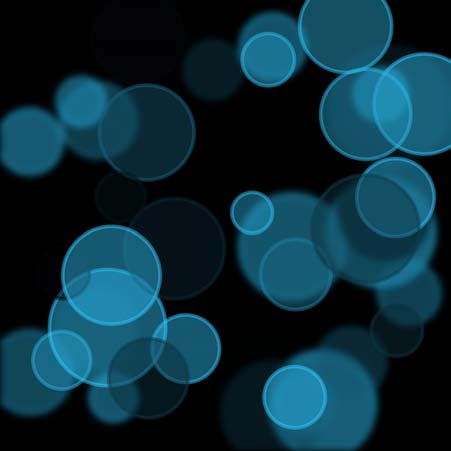
图7-3

图7-3模糊构建复杂而有趣的深度效果。

虽然模糊是许多绘图算法的一部分,并且在iOS 7 UI中也起到非常重要作用,但其实现位于Core Graphics和UIKit API之外。 在写这本书的时候,苹果公司还没有发布自己的iOS 7模糊的API。 苹果工程师建议使用Core Image和Accelerate的图像处理解决方案进行第三方开发。

清单7-3使用了Core Image方法。 它是最初使用iOS 6推出的。这个实现很简单,只需几行代码,速度和开销就可以接受。

当然可以接受的是一个相对的术语。 我鼓励您花时间在基于设备的绘图任务上,以确保它们不会重载GUI。(记住,大多数绘图是线程安全的!)就是因为这些方面,模糊是一个特别昂贵的操作。 我发现Core Image和Accelerate解决方案倾向于使用与设备相同的开销运行。Core Image更容易阅读; 这是我在这里囊括的那个。

除了使用性能监控工具,您还可以在代码中使用简单的计时检查。 存储绘制前的当前日期,并检查绘图结束后的经过时间间隔。 以下是一个例子:

1
2
3
4
NSDate *date = [NSDate date];
// Perform drawing task here
NSLog(@"Elapsed time: %f”,
[[NSDate date] timeIntervalSinceDate:date]);

记住大多数绘图是线程安全的。 只要有可能,将你的模糊程序移出主线程。 存储能复用的结果,无论是在内存中还是本地缓存到沙箱中。

Note

高斯滤波器的模糊输出大于输入图像,以适应所有方面的模糊。 清单7-3中的Crop过滤器将恢复原始维度。

清单7-3Core Image模糊

1
2
3
4
5
6
7
8
9
10
11
12
13
14
15
16
17
18
19
20
21
22
23
24
25
26
27
28
29
30
31
32
33
34
35
36
37
38
39
40
41
42
43
44
45
46
47
48
49
50
UIImage *GaussianBlurImage(
UIImage *image, NSInteger radius)
{
if (!image) COMPLAIN_AND_BAIL_NIL(
@"Mask cannot be nil", nil);

// Create Core Image blur filter
CIFilter *blurFilter =
[CIFilter filterWithName:@"CIGaussianBlur"];
[blurFilter setValue:@(radius) forKey:@"inputRadius"];
// Pass the source image as the input
[blurFilter setValue:[CIImage imageWithCGImage:
image.CGImage] forKey:@"inputImage"];

CIFilter *crop =
[CIFilter filterWithName: @"CICrop"];
[crop setDefaults];
[crop setValue:blurFilter.outputImage
forKey:@"inputImage"];

// Apply crop
CGFloat scale = [[UIScreen mainScreen] scale];
CGFloat w = image.size.width * scale;
CGFloat h = image.size.height * scale;
CIVector *v = [CIVector vectorWithX:0 Y:0 Z:w W:h];
[crop setValue:v forKey:@"inputRectangle"];

CGImageRef cgImageRef =
[[CIContext contextWithOptions:nil]
createCGImage:crop.outputImage
fromRect:crop.outputImage.extent];

// Render the cropped, blurred results
UIGraphicsBeginImageContextWithOptions(
image.size, NO, 0.0);

// Flip for Quartz drawing
FlipContextVertically(image.size);

// Draw the image
CGContextDrawImage(UIGraphicsGetCurrentContext(),
SizeMakeRect(image.size), cgImageRef);

// Retrieve the final image
UIImage *blurred =
UIGraphicsGetImageFromCurrentImageContext();
UIGraphicsEndImageContext();

return blurred;
}

模糊绘图块

清单7-4再次返回到封装了一系列绘图命令的Objective-C块。 在这种情况下,解决方案会使绘图操作模糊,并将其绘制到当前的上下文中。

为了实现这一点,该功能必须模拟透明层。 它不能直接使用透明层,因为没有办法拦截该素材,使其模糊,然后将其直接传递给上下文。 相反,该函数使用DrawIntoImage()将其块绘制到一个新的图像中(见清单7-1),使它变得模糊(使用清单7-3),然后将结果绘制到活动上下文。

您将看到图7-3中的清单7-4的结果。 该图像由两个绘制随机圆的请求组成。 第一个是使用一个模糊的块应用的,第二个没有:

1
2
3
4
DrawAndBlur(4, ^{[self drawRandomCircles:20
withHue:targetColor into:targetRect];});
[self drawRandomCircles:20
withHue:targetColor into:targetRect];

清单7-4将模糊应用于绘图块

1
2
3
4
5
6
7
8
9
10
11
12
13
14
15
16
17
18
19
20
21
22
23
24
25
26
27
28
29
30
31
// Return the current context size
CGSize GetUIKitContextSize()
{
CGContextRef context = UIGraphicsGetCurrentContext();
if (context == NULL) return CGSizeZero;

CGSize size = CGSizeMake(
CGBitmapContextGetWidth(context),
CGBitmapContextGetHeight(context));
CGFloat scale = [UIScreen mainScreen].scale;
return CGSizeMake(size.width / scale,
size.height / scale);
}

// Draw blurred block
void DrawAndBlur(CGFloat radius, DrawingStateBlock block)
{
if (!block) return; // Nothing to do

CGContextRef context = UIGraphicsGetCurrentContext();
if (context == NULL) COMPLAIN_AND_BAIL(
@"No context to draw into", nil);

// Draw and blur the image
UIImage *baseImage = DrawIntoImage(
GetUIKitContextSize(), block);
UIImage *blurred = GaussianBlurImage(baseImage, radius);

// Draw the results
[blurred drawAtPoint:CGPointZero];
}

模糊的蒙版

当您模糊蒙版时,您将为绘图创建更柔和的边缘。 图7-4显示了使用圆角矩形Bezier路径的正常轮廓和已被模糊(其轮廓)的图形绘制图像的结果(参见示例7-2)。 在顶部图像中,路径已填充但未模糊。 在底部图像中,DrawAndBlur()请求软化填充路径的边缘。

软化边缘使图形能够平滑地融合到屏幕上。 这种技术也称为羽化。 在羽化中,边缘蒙版被软化以在绘制的图像与其背景之间创建更平滑的过渡。
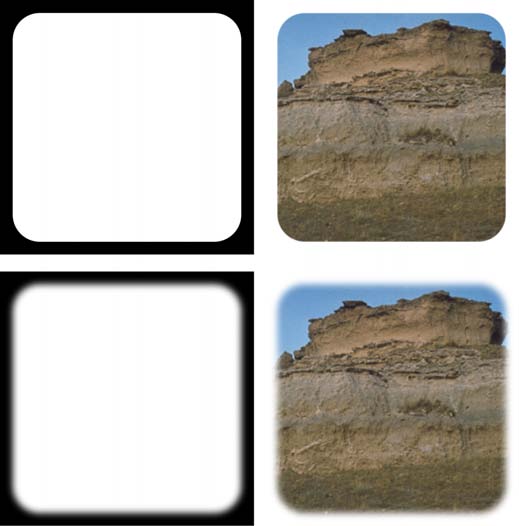
图7-4

图7-4模糊蒙版创建更柔和的边缘。 Public domain images courtesy of the National Park Service.

示例7-2绘制模糊的蒙版

1
2
3
4
5
6
7
8
9
10
11
UIBezierPath *path = [UIBezierPath
bezierPathWithRoundedRect:inset cornerRadius:32];

UIImage *mask = DrawIntoImage(targetRect.size, ^{
FillRect(targetRect, [UIColor blackColor]);
DrawAndBlur(8, ^{[path fill:[UIColor whiteColor]];}); // blurred
// [path fill:[UIColor whiteColor]]; // non-blurred
});

ApplyMaskToContext(mask);
[agate drawInRect:targetRect];

模糊射灯

将“光”绘制到上下文中是模糊的另一个常见用例。 在这种情况下,您的目标是减轻像素,可选择添加颜色,并混合光线,而不遮挡已经绘制到上下文的项目。 图7-5显示了几种方法。 正如你所看到的,他们之间的差异是相当微妙的。
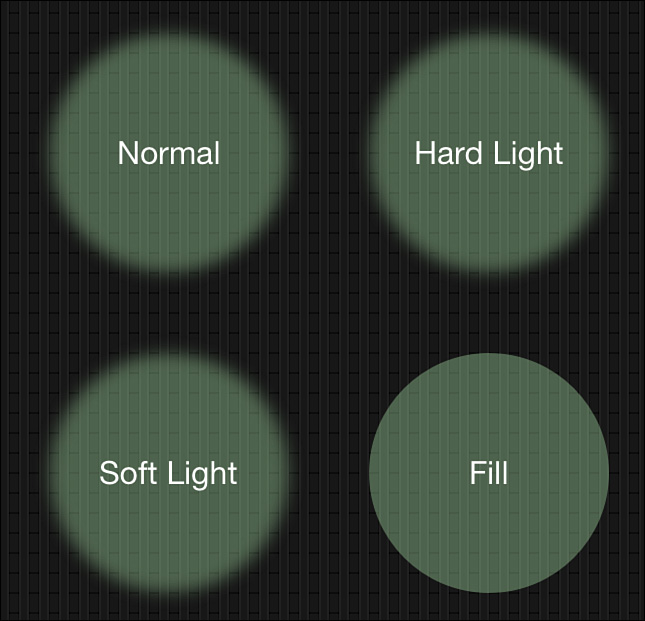
图7-5

图7-5模糊模拟照射在背景表面上的光。

图7-5中的所有四个示例都包含一个填充有浅色半透明绿色的圆形路径。 除了右下角的圆圈的每个样本,使用以下代码模糊:

1
2
3
4
5
6
path = [UIBezierPath bezierPathWithOvalInRect:rect];
PushDraw(^{
CGContextSetBlendMode(UIGraphicsGetCurrentContext(),
blendMode);
DrawAndBlur(8, ^{[path fill:spotlightColor];});
});

左上角的示例使用正常混合模式,右上角的示例使用硬灯模式,左下角的示例使用柔光模式。 以下是一些注意事项:

  • 右上角的kCGBlendModeHardLight样本产生最细微的照明,将最简单的亮点添加到原始背景。
  • 左下角的kCGBlendModeSoftLight示例最为漫长,突出显示。
  • 左上角的kCGBlendModeNormal样本落在这两个之间。光场的中心实际上与右下方的样本匹配,没有模糊的样本,也是使用正常混合绘制的。

本文翻译自《iOS Drawing Practical UIKit Solutions》作者:Erica Sadun,翻译:Cheng Dong。如果觉得本书不错请购买支持正版:亚马逊购买传送门,本书所有源代码可在GitHub上下载。译者虽然力求做到信,达,雅,但是由于时间仓促加之译者水平十分有限,文中难免会出现不正确,不准确,词不达意,难于理解的地方,还望各位批评指正,共同进步,谢谢。转载请注明出处。