CodeV

6.12-基本按钮光泽

许多iOS开发人员将继续使用渐变来为按钮添加伪光,即使是在iOS 7的勇敢的新的扁平白色时代。他们明白自定义按钮的使用不会废除深度和尊重的原则。

光泽创造了3D感觉,可以应用于多种视图,而不仅仅是按钮。 当使用从非系统提供的项目创建的接口时,它们发挥其最重要的作用。 如果您的应用程序主要基于Apple系统控件,请继续使用3D(视图)感觉 - 使用无边框按钮和白色边缘到边缘的设计。 如果不是,您在此处和以下部分中阅读的技术有助于生成丰富的替代方案。

简单的光泽由在按钮的一半绘制的线性渐变组成,在颜色顺序上突然中断,并继续剩余部分的距离。 图6-20显示了应用于几种背景颜色的常用光泽方法。
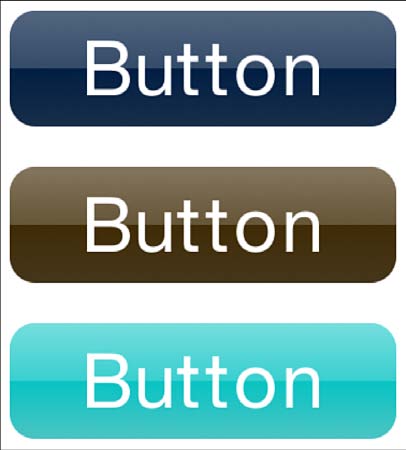
图6-20

图6-20线性的基于渐变的按钮光泽。

有大约十亿种方法来创建这种高亮渐变,所有这些都是一个相当类似的主题的变化。 清单6-11来自很久以前的Matt Gallagher(http://www.cocoawithlove.com)的启发。 你在我的代码清单中看到的混乱没有一个是他的错,但是由于他的灵感合理的输出的一切还是不错的。

清单6-11构建线性光泽渐变叠加

1
2
3
4
5
6
7
8
9
10
11
12
13
14
15
16
17
18
19
20
21
22
23
24
25
26
27
28
29
30
31
32
33
34
35
36
37
38
39
40
+ (instancetype) linearGloss:(UIColor *) color
{
CGFloat r, g, b, a;
[color getRed:&r green:&g blue:&b alpha:&a];

// Calculate top gloss as half the core color luminosity
CGFloat l = (0.299f * r + 0.587f * g + 0.114f * b);
CGFloat gloss = pow(l, 0.2) * 0.5;

// Retrieve color values for the bottom gradient
CGFloat h, s, v;
[color getHue:&h saturation:&s brightness:&v alpha:NULL];
s = fminf(s, 0.2f);

// Rotate the color wheel by 0.6 PI. Dark colors
// move toward magenta, light ones toward yellow
CGFloat rHue = ((h < 0.95) && (h > 0.7)) ? 0.67 : 0.17;
CGFloat phi = rHue * M_PI * 2;
CGFloat theta = h * M_PI;

// Interpolate distance to the reference color
CGFloat dTheta = (theta - phi);
while (dTheta < 0) dTheta += M_PI * 2;
while (dTheta > 2 * M_PI) dTheta -= M_PI_2;
CGFloat factor = 0.7 + 0.3 * cosf(dTheta);

// Build highlight colors by interpolating between
// the source color and the reference color
UIColor *c1 = [UIColor colorWithHue:h * factor +
(1 - factor) * rHue saturation:s
brightness:v * factor + (1 - factor) alpha:gloss];
UIColor *c2 = [c1 colorWithAlphaComponent:0];

// Build and return the final gradient
NSArray *colors = @[WHITE_LEVEL(1, gloss),
WHITE_LEVEL(1, 0.2), c2, c1];
NSArray *locations = @[@(0.0), @(0.5), @(0.5), @(1)];
return [Gradient gradientWithColors:colors
locations:locations];
}

剪贴的光泽

清单6-12提供了另一个常采用的(绘制)按钮光泽。 在这种方法中(见图6-21),您偏移路径轮廓,然后切除渐变叠加的一部分。 结果是从覆盖到按钮内容的非常尖锐的过渡。
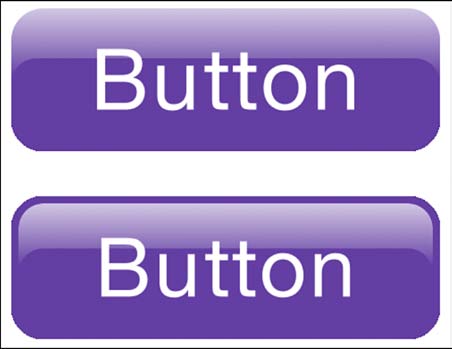
图6-21

图6-21直接在边缘(edges)(顶部)和插入(inset)(底部)应用的剪切按钮光泽。

绘图和剪切发生在透明层中。 这种方法确保只有预期的覆盖存留以将其光泽存储在原始绘图上下文上。 该功能在透明层完成之前清除剩余的部分。

清单6-12构建Clipped Button Overlay

1
2
3
4
5
6
7
8
9
10
11
12
13
14
15
16
17
18
19
20
21
22
23
24
25
26
27
28
29
30
31
32
33
34
35
36
37
38
39
40
void DrawButtonGloss(UIBezierPath *path)
{
if (!path) COMPLAIN_AND_BAIL(
@"Path cannot be nil", nil);
CGContextRef context = UIGraphicsGetCurrentContext();
if (context == NULL) COMPLAIN_AND_BAIL(
@"No context to draw into", nil);

// Create a simple white to clear gradient
Gradient *gradient =
[Gradient gradientFrom:WHITE_LEVEL(1, 1) to:
WHITE_LEVEL(1, 0)];

// Copy and offset the path by 35% vertically
UIBezierPath *offset = [UIBezierPath bezierPath];
[offset appendPath:path];
CGRect bounding = path.calculatedBounds;
OffsetPath(offset, CGSizeMake(0,
bounding.size.height * 0.35));

// Draw from just over the path to its middle
CGPoint p1 = RectGetPointAtPercents(
bounding, 0.5, -0.2);
CGPoint p2 = RectGetPointAtPercents(
bounding, 0.5, 0.5);

PushLayerDraw(^{
PushDraw(^{
// Draw the overlay inside the path bounds
[path addClip];
[gradient drawFrom:p1 toPoint:p2];
});

PushDraw(^{
// And then clear away the offset area
[offset addClip];
CGContextClearRect(context, bounding);
});
});
}

本文翻译自《iOS Drawing Practical UIKit Solutions》作者:Erica Sadun,翻译:Cheng Dong。如果觉得本书不错请购买支持正版:亚马逊购买传送门,本书所有源代码可在GitHub上下载。译者虽然力求做到信,达,雅,但是由于时间仓促加之译者水平十分有限,文中难免会出现不正确,不准确,词不达意,难于理解的地方,还望各位批评指正,共同进步,谢谢。转载请注明出处。