在iOS和OS X中新的基于约束的系统Auto Layout下,视图的内容在其布局中扮演与其约束一样重要的角色。这通过每个视图的固有内容大小来表示。此大小描述了不压缩或裁剪数据表示全视图内容所需的最小空间。它源自每个视图呈现的内容的属性。在图片和绘图的情况下,它表示图像的点的“自然尺寸”。
当您的图片中包含阴影,火花和其他超出图片核心内容的项目时,该自然大小可能不再能反映出您希望Auto Layout处理布局的正确方式。在自动布局中,约束使用称为alignment rectangle的几何元素确定视图大小和位置。正如您将看到的,UIKit调用可帮助控制该展示的位置。
Alignment Rectangles
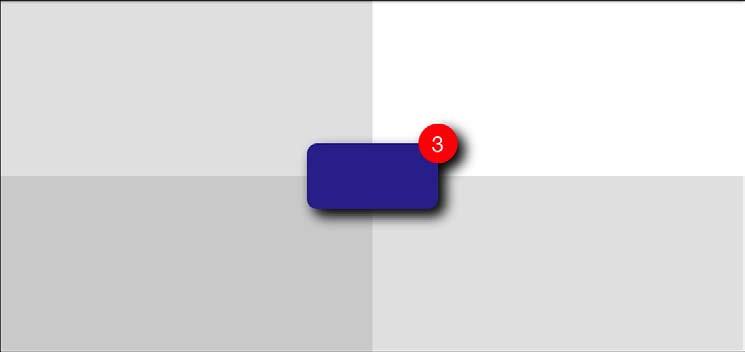
当开发人员创建复杂的视图时,他们可能会引入视觉装饰,如阴影,外部亮点,反射和雕刻线。 当他们这样做时,这些特征通常绘制在图片上。与frames不同,视图的alignment rectangle应限于核心视觉元素。当新项目绘制到视图上时,其大小应保持不受影响。看图3-6(左),它描绘了用阴影和badge绘制的视图。当布局此视图时,您希望自动布局集中于只对准核心元素 - 蓝色矩形,而不是装饰(badge红点)。

图3-6视图的alignment rectangle(中)严格地指要对齐的不带修饰(badge)的核心视觉元素。
当中的图像突出显示视图的对齐矩形。此矩形不包括所有装饰,如下拉阴影和badge。它是当Auto Layout执行其工作时要考虑的视图的一部分。与右图所示的矩形对比,右图包括所有的视觉装饰,将视图的frame延伸到应该考虑对齐的区域之外。
右边的矩形包含所有视图的视觉元素。它包括阴影和badge。如果在布局期间考虑视图的对齐,这些装饰物可能会丢弃视图的对齐特性(例如,它的中心,底部和右侧)。
通过使用alignment rectangles而不是frames,自动布局确保在布局期间适当考虑关键信息,如视图的边缘和中心。在图3-7中间图,装饰视图在背景网格上完美对齐。放置期间不考虑其badge和阴影。

图3-7自动布局将视图的对齐矩形放置为其父对象中心时。阴影和badge不会影响其位置。
Alignment Insets
绘图艺术通常包含硬编码的装饰,如高光,阴影等。这些项目只占用很少的内存并且高效运行。 因此,许多开发人员会因为它们的低开销而预绘制效果。
要容纳额外的可视元素,请使用imageWithAlignmentRectInsets:. 提供一个UIEdgeInset结构体,UIImage返回了inset-aware的图像。Insets定义从某个矩形的顶部,左侧,底部和右侧的偏移。您可以使用这些来描述从矩形边缘移入(使用正值)或移出(使用负值)的距离。这些insets确保对齐矩形是合适放置的,即使在图像中放置了绘制的装饰。
1 | typedef struct { |
以下代码片段通过在底部和右侧对alignment rect设置内置偏移来容纳20点阴影:
1 | UIImage *image = [[UIImage imageNamed:@"Shadowed.png"] imageWithAlignmentRectInsets:UIEdgeInsetsMake(0, 0, 20, 20)]; |
手工构建这些insets有些痛苦,特别是如果你可能以后要更新你的图形时。当您知道对齐矩形和整体图像边界时,您可以自动计算您需要传递到此方法的边缘insets。清单3-8定义了一个简单的inset构建器。它确定对齐矩形离父矩形的每个边缘有多远,并返回一个表示这些值的UIEdgeInset结构体。使用此函数根据核心可视元素的内在几何图形构建insets。
列表3-8从对齐矩形创建边缘Insets
1 | UIEdgeInsets BuildInsets(CGRect alignmentRect, CGRect imageBounds) |
Drawing Images with Alignment Rects
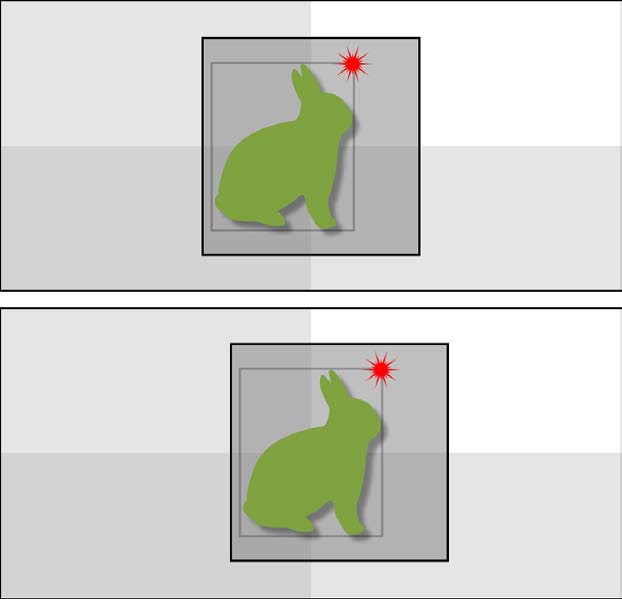
图3-8演示了实际工作中的对齐矩形布局。视图中顶部的图像不表示对齐偏好。因此,整个图像(半透明的灰色正方形,包括兔子,阴影和星形)在父视图内居中。底部的图像使用alignment insets,这些只使用兔子的边界框(内轮廓)作为参考,在这里,中心改变了,它现在的中心是兔子,而不是以父视图为中心的整体。额外的绘图区域和其他图像详细信息不再对该位置有影响。

图3-8您可以将alignment rectangle awareness集成到绘图例程中,以确保自动布局正确对齐。在顶部图像中,用黑色轮廓的大正方形用于对齐。在底部图像中,围绕兔子的inset灰色矩形是对齐矩形。
代码清单3-9详细描述了底部图像背后的绘图和对齐过程。它创建一个具有灰色背景,绿色兔子,红色badge和显示兔子的边界轮廓的图像,过程中,它给兔子添加一个阴影,并将badge移动到兔子的右上角。即使是在iOS 7的扁平,清爽的审美视觉中,阴影和badge也是在普通iOS视觉元素中使用的相当常见的项目。
最后,重要的部分是指定如何对齐输出图像。为了做到这一点,这个代码从兔子的UIBezierPath中检索边界框。此路径独立于badge,背景和绘制的阴影。通过应用代码清单3-8返回的边缘insets,清单3-9创建了一个围绕兔子和只有兔子对齐父视图的图像。
使用Quartz 2D和UIKit在自动布局中无缝工作是一个非常强大的方法来绘制装饰图形。
清单3-9在中心绘图与对齐
1 | UIBezierPath *path; |
本文翻译自《iOS Drawing Practical UIKit Solutions》作者:Erica Sadun,翻译:Cheng Dong。如果觉得本书不错请购买支持正版:亚马逊购买传送门,本书所有源代码可在GitHub上下载。译者虽然力求做到信,达,雅,但是由于时间仓促加之译者水平十分有限,文中难免会出现不正确,不准确,词不达意,难于理解的地方,还望各位批评指正,共同进步,谢谢。转载请注明出处。