CodeV

1.13-变换

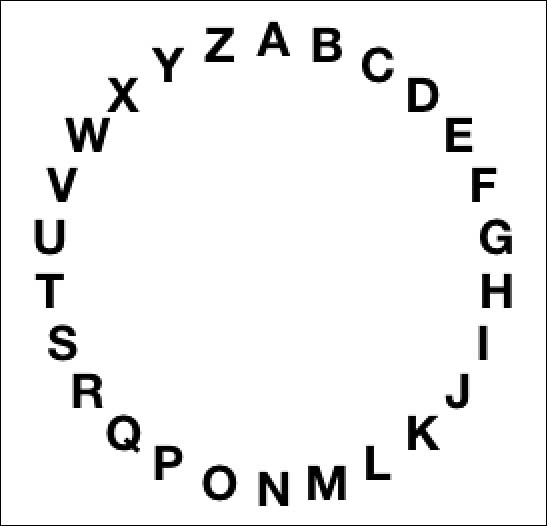
图 1-13 中的字母序列是通过在圆周上的点的位置上绘制每个字符来构建的。这个图利用了UIKit的一些内置功能:NSString实例知道如何将自己绘制到上下文中。你只是告诉一个字符串在一个点或矩形中绘制,如下例所示:

1
[@"Hello" drawAtPoint:CGPointMake(100, 50) withAttributes:@{NSFontAttributeName:font}]

此调用的语法是在iOS 7中更改的,废弃了早期的API。在iOS 7之前,使用下面的API:

1
[@"Hello" drawAtPoint:CGPointMake(100, 50) withFont:font]

图1-13

图 1-13 沿着圆圈绘制字母序列

这个圆圈由每个字母累加(2×Pi / 26)的弧度顺时针排列的。每个字母x和y位置计算为从公共中心的偏移。以下代码使用 r sin(theta) 和 r cos(theta) 迭代计算围绕圆的点的坐标,使用这些点来放置每个字母:

1
2
3
4
5
6
7
8
9
10
11
12
NSString *alphabet = @"ABCDEFGHIJKLMNOPQRSTUVWXYZ";
for(int i=0;i<26;i++)
{
NSString *letter = [alphabet substringWithRange:NSMakeRange(i, 1)];
CGSize letterSize = [letter sizeWithAttributes:@{NSFontAttributeName:font}];

CGFloat theta = M_PI - i * (2 * M_PI / 26.0);
CGFloat x = center.x + r * sin(theta) - letterSize.width / 2.0;
CGFloat y = center.y + r * cos(theta) - letterSize.height / 2.0;

[letter drawAtPoint:CGPointMake(x, y) withAttributes:@{NSFontAttributeName:font}];
}

这是一个应对这个挑战的可接受的方法,但你也可以通过利用上下文变换大大提升绘图效率。

Note

高等代数对于使用Core Graphics的开发人员来说是至关重要的。回顾sine(正弦),cosine(余弦),tangents(正切)和matrices(矩阵)等概念可以为您提供令人兴奋的工具来解决问题。 Rusty? Khan Academy(www.khanacademy.org)为提升你的技能提供了不可或缺的资源。

转换状态

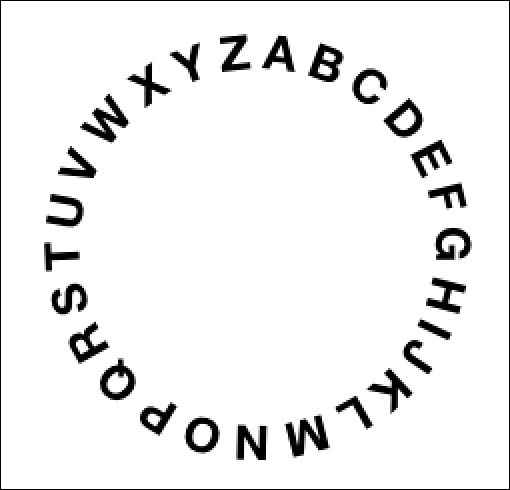
每个上下文存储2D仿射变换作为其状态的一部分。该变换被称为当前变换矩阵。它指定如何在绘图时旋转,平移和缩放上下文。它提供了一种强大而灵活的方式来创建高级绘图操作。对比图 1-14 中的布局与图 1-13 中的布局。这种改进是通过上下文变换来实现的。
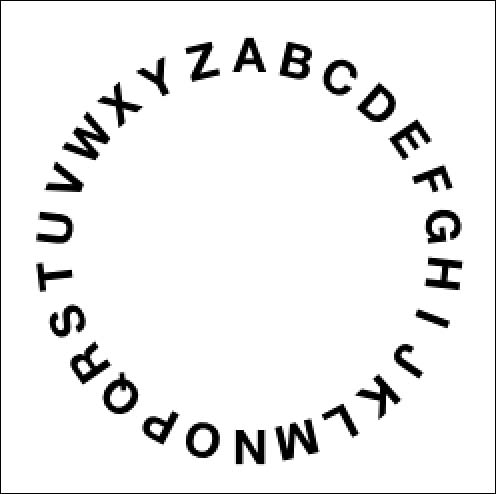
图1-14

图 1-14 使用transforms在圆中绘制字母。

清单 1-12 显示了创建这些的步骤。它包括一系列旋转画布并绘制每个字母的转换操作。上下文保存和恢复操作确保从一个绘图操作持续到下一个绘图操作的唯一变换是在清单中以粗体显示的变换:CGContextTranslateCTM(context, center.x, center.y);。 此转换将上下文的起点设置为其中心点。

这使得上下文能够围绕该点自由旋转,因此每个字母可以在精确的半径处绘制。向左移动每个字母宽度的一半确保每个字母围绕该半径的末端处的点为字母中心进行绘制。

清单 1-12 在绘制期间转换上下文

1
2
3
4
5
6
7
8
9
10
11
12
13
14
15
16
17
18
19
20
21
22
23
24
25
26
27
28
29
30
31
32
33
34
35
36
37
38
39
40
41
42
43
44
45
NSString *alphabet = @"ABCDEFGHIJKLMNOPQRSTUVWXYZ";

// Start drawing
UIGraphicsBeginImageContext(bounds.size);
CGContextRef context = UIGraphicsGetCurrentContext();

// Retrieve the center and set a radius
CGPoint center = RectGetCenter(bounds);
CGFloat r = center.x * 0.75f;

// Start by adjusting the context origin
// This affects all subsequent operations
CGContextTranslateCTM(context, center.x, center.y);

// Iterate through the alphabet
for (int i = 0; i < 26; i++)
{
// Retrieve the letter and measure its display size
NSString *letter = [alphabet substringWithRange:NSMakeRange(i, 1)];
CGSize letterSize = [letter sizeWithAttributes:@{NSFontAttributeName:font}];

// Calculate the current angular offset
CGFloat theta = i * (2 * M_PI / (float) 26);

// Encapsulate each stage of the drawing
CGContextSaveGState(context);

// Rotate the context
CGContextRotateCTM(context, theta);

// Translate up to the edge of the radius and move left by
// half the letter width. The height translation is negative
// as this drawing sequence uses the UIKit coordinate system.
// Transformations that move up go to lower y values.
CGContextTranslateCTM(context, -letterSize.width / 2, -r);

// Draw the letter and pop the transform state
[letter drawAtPoint:CGPointMake(0, 0) withAttributes:@{NSFontAttributeName:font}];
CGContextRestoreGState(context);
}

// Retrieve and return the image
UIImage *image = UIGraphicsGetImageFromCurrentImageContext();
UIGraphicsEndImageContext();
return image;

构建更精确的布局

避免 I 与周围的额外间距和 W 与周围的挤压(I所占空间较小,W所占空间较大)是一个更好的绘制一个圆圈中字母的解决方案。清单 1-13 详细介绍了创建更精确的布局所需的步骤,如图 1-15 所示。此示例演示了更精细的布局摆放。

首先计算布局的总宽度。计算每个单独字母的宽度的总和,或者直接测量整个字符串的宽度。这使您能够标记沿布局的进度,产生从开始到结束的每个字母的进度百分比。

接下来,根据每次迭代字母消耗的百分比,调整每个字母的展示位置。使用此百分比来计算放置字母的旋转角度。

就像清单 1-12 所示一样绘制字母。你最终得到的是一个考虑到了每个字母宽度的不同,根据字母的自然大小按比例摆放的布局。

清单 1-13 围绕圆的精确的文本布局

1
2
3
4
5
6
7
8
9
10
11
12
13
14
15
16
17
18
19
20
21
22
23
24
25
26
27
28
29
30
31
32
33
34
35
36
37
38
39
40
41
// Calculate the full extent
CGFloat fullSize = 0;
for (int i = 0; i < 26; i++)
{
NSString *letter = [alphabet substringWithRange:NSMakeRange(i, 1)];
CGSize letterSize = [letter sizeWithAttributes:@{NSFontAttributeName:font}];
fullSize += letterSize.width;
}

// Initialize the consumed space
CGFloat consumedSize = 0.0f;

// Iterate through each letter, consuming that width
for (int i = 0; i < 26; i++)
{
// Measure each letter
NSString *letter = [alphabet substringWithRange:NSMakeRange(i, 1)];
CGSize letterSize = [letter sizeWithAttributes:@{NSFontAttributeName:font}];

// Move the pointer forward, calculating the
// new percentage of travel along the path
consumedSize += letterSize.width / 2.0f;
CGFloat percent = consumedSize / fullSize;
CGFloat theta = percent * 2 * M_PI;
consumedSize += letterSize.width / 2.0f;

// Prepare to draw the letter by saving the state
CGContextSaveGState(context);

// Rotate the context by the calculated angle
CGContextRotateCTM(context, theta);

// Move to the letter position
CGContextTranslateCTM(context, -letterSize.width / 2, -r);

// Draw the letter
[letter drawAtPoint:CGPointMake(0, 0) withFont:font];

// Reset the context back to the way it was
CGContextRestoreGState(context);
}

图1-15

图 1-15 此版本使用基于每个字母的宽度不同的更好的间距布局。


本文翻译自《iOS Drawing Practical UIKit Solutions》作者:Erica Sadun,翻译:Cheng Dong。如果觉得本书不错请购买支持正版:亚马逊购买传送门,本书所有源代码可在GitHub上下载。译者虽然力求做到信,达,雅,但是由于时间仓促加之译者水平十分有限,文中难免会出现不正确,不准确,词不达意,难于理解的地方,还望各位批评指正,共同进步,谢谢。转载请注明出处。