CodeV

1.11-上下文坐标系统

当您主要使用UIKit进行绘图工作时,坐标系统是从屏幕的左上角开始(0,0),并向右和向下延伸。而在Quartz中,坐标系是从屏幕的左下角开始的。

如图1-11。它描绘了在UIKit(左)和Quartz(右)中绘制的正方形{20,20,40,40}。在每种情况下,对象都从原点开始偏离20个点。但是,你可以看到,原点在每种情况下都不同。
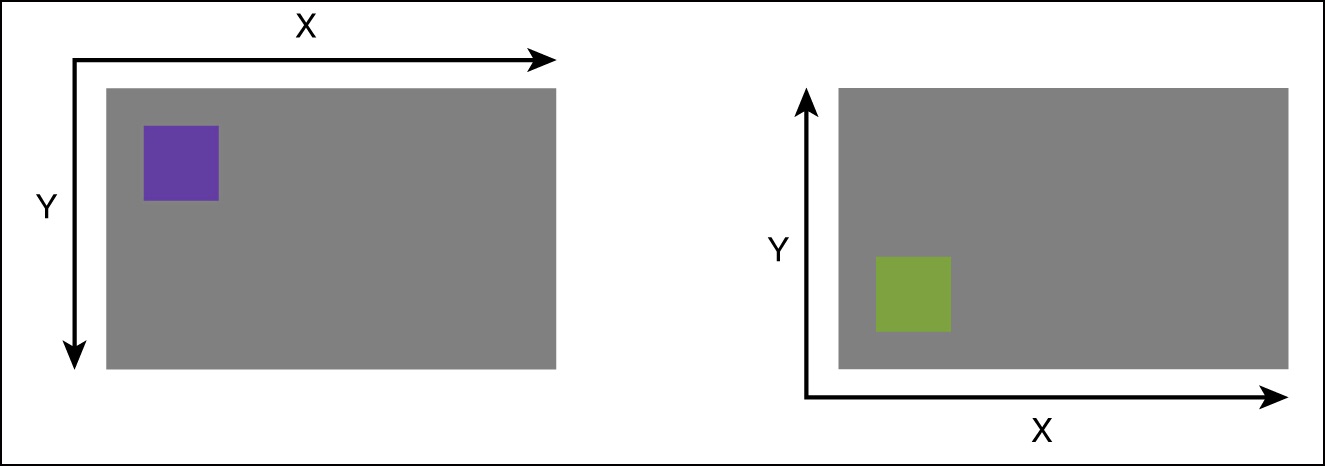
图1-11

图1-11 UIKit原点(左上角)与Quartz原点(左下角)不同。

坐标系原点在什么位置取决于你是如何创建上下文的。如果你使用任何UIKit函数构建它,原点在左上角。如果你使用CGBitmapContextCreate()创建上下文,原点在左下角。

翻转上下文

你可以调整Core Graphics上下文以使用UIKit的原点。清单 1-10 显示了实现这些步骤的代码:

  1. CGContextRef压入到UIKit图形栈。
  2. 垂直翻转上下文。你可以通过scales和translates转换原始上下文建立一个变换来实现这一步。
  3. 将变换连接到上下文的当前变换矩阵(CTM)。这将调整上下文的坐标系以模拟UIKit,从而从左上角开始绘制。
  4. 使用新的坐标系执行任何绘图操作。
  5. 弹出图形栈。

您可以直接使用Quartz实现,而不应用此坐标系。然而,大多数UIKit开发人员都喜欢使用单一的,与开发人员绘图时比较熟悉的视图坐标罗列计算方式相匹配的坐标系。一些开发人员也会创建双向宏来实现相同的翻转功能。这使得它们可以在使用QUARTZ的绘图请求中可视化地匹配非QUARTZ坐标系下的绘图请求。例程不用改变,但开发人员可以了解代码检查的当前状态。

清单 1-10 包含了一个辅助翻转的例程,不需要你用点来提供上下文大小。老实说,这有点旁门左道,但它的确有用,因为它检索的图像将使用与上下文相同的大小和缩放比例。

您还可以通过调用CGBitmapContextGetHeight()CGBitmapContextGetWidth()来检索上下文的大小,并需要将这些函数返回的像素数除以屏幕的缩放比例。这前提是假设你正在使用某种位图上下文(例如由UIGraphicsBeginImageContextWithOptions()创建的位图上下文),并且在该上下文中也匹配屏幕的缩放比例。

清单 1-10 调整坐标系原点

1
2
3
4
5
6
7
8
9
10
11
12
13
14
15
16
17
18
19
20
21
22
23
24
25
26
27
28
29
30
31
32
33
34
35
36
37
38
39
40
41
42
43
44
45
46
47
48
49
50
51
52
53
54
// Flip context by supplying the size
void FlipContextVertically(CGSize size)
{
CGContextRef context = UIGraphicsGetCurrentContext();
if (context == NULL)
{
NSLog(@"Error: No context to flip");
return;
}
CGAffineTransform transform = CGAffineTransformIdentity;
transform = CGAffineTransformScale(transform, 1.0f, -1.0f);
transform = CGAffineTransformTranslate(transform, 0.0f, -size.height);
CGContextConcatCTM(context, transform);
}

// Flip context by retrieving image
void FlipImageContextVertically()
{
CGContextRef context = UIGraphicsGetCurrentContext();
if (context == NULL)
{
NSLog(@"Error: No context to flip");
return;
}
UIImage *image = UIGraphicsGetImageFromCurrentImageContext();
FlipContextVertically(image.size);
}

// Query context for size and use screen scale
// to map from Quartz pixels to UIKit points
CGSize GetUIKitContextSize()
{
CGContextRef context = UIGraphicsGetCurrentContext();
if (context == NULL) return CGSizeZero;
CGSize size = CGSizeMake(CGBitmapContextGetWidth(context), CGBitmapContextGetHeight(context));
CGFloat scale = [UIScreen mainScreen].scale;
return CGSizeMake(size.width / scale, size.height / scale);
}

// Initialize the UIKit context stack
UIGraphicsPushContext(context);

// Flip the context vertically
FlipContextVertically(size);

// Draw the test rectangle. It will now use the UIKit origin
// instead of the Quartz origin.
CGRect testRect = CGRectMake(20, 20, 40, 40);
UIBezierPath *path = [UIBezierPath bezierPathWithRect:testRect];
[greenColor set];
[path fill];

// Pop the context stack
UIGraphicsPopContext();

本文翻译自《iOS Drawing Practical UIKit Solutions》作者:Erica Sadun,翻译:Cheng Dong。如果觉得本书不错请购买支持正版:亚马逊购买传送门,本书所有源代码可在GitHub上下载。译者虽然力求做到信,达,雅,但是由于时间仓促加之译者水平十分有限,文中难免会出现不正确,不准确,词不达意,难于理解的地方,还望各位批评指正,共同进步,谢谢。转载请注明出处。